CameraQuest Home Camera Articles FOR SALE Orders I Buy / Wants Repairs Books Adapters
Epson R-D1: Rangefinder adjustment
The rangefinder mechanism: what needs adjusting
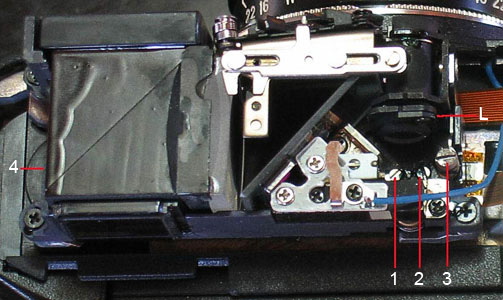
In Figure 1, L is the rear element of the finder patch lens. This element is mounted on a bracket that is connected by a linkage, and swings left or right as you focus the camera lens, which moves a cam that pushes a roller in or out. This moves the patch left to right in the main viewfinder. Problems arise when the finder patch and the camera lens are not in synchronisation, the patch position is either too high or too low or the patch is not in focus. A simplified diagram showing how the rangefinder mechanism works can be found here.
Jim Williams has written an article on how the Epson R-D1 rangefinder works and is adjusted, with several photographs, that usefully supplements this page.
 |
|
| (a) | |
 |
 |
| (b) | (c) |
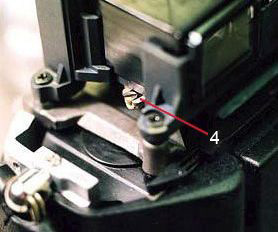
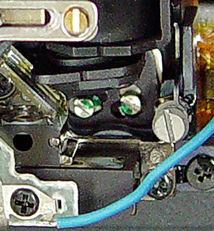
Figure 1. Location of the rangefinder adjustment screws (camera top plate removed). (a) Screws 1–3 are accessible by removing the hot shoe. (b) Screw 4, located to the left of the viewfinder, can only be accessed by removing the top plate; however, in most cases, screw 4 will not need to be adjusted. (c) Close up view of screws 1–3. (Photos courtesy of: (a) Tim Messenger; (b) Don Goldberg, DAG Camera Parts; (c) Steve’s Camera Service Center.)
The adjustment screws
The adjustment screws for correcting a misaligned finder are (Figure 1):
- Screw 1: finder patch focus adjustment.
- Screw 2: finder patch horizontal (left/right) alignment (for lens infinity focus).
- Screw 3: finder patch vertical (up/down) alignment.
- Screw 4: base length adjustment (for lens close focus).
Screws 1–3 are accessible by removing the hot shoe, although removing the top plate makes adjustment easier. Screw 4 can only be accessed by taking off the top plate; however, it rarely needs adjustment.
Notes
- Screws 1–4 are very sensitive, and will need turning by only a few degrees to correct any misalignment.
- Avoid pressing down on the screws with the screwdriver, as this tension will cause the rangefinder patch to shift. Screw 2 is particularly sensitive to pressure.
- Screws 1 and 2 have eccentric shafts, so that after half a revolution the adjustment will move in the opposite direction, and a full turn will return the adjustment to where you started.
- The eccentric screws 1 and 2 each ride in a slot, and this slot can be gummed up with sealing compound, preventing adjustment: even if a screw isn’t locked tight, the elastic compound can rotate the screw back towards its initial position. This is easy to deal with when the top is removed: use a little lacquer thinner on a small artists’ brush to dissolve and remove the compound.
Epson R-D1s
There are anecdotal reports that Epson R-D1s has a slightly revised rangefinder so that screw 3 no longer has any effect on the vertical alignment of the finder patch. This is incorrect: the rangefinder in the R-D1s is identical to that in the R-D1.
Adjusting the rangefinder
When focus is corrected for infinity, the near focus will usually be accurate too.
Finder patch
It is more convenient to correct any focus patch misalignment before adjusting for infinity and close focus:
• Correcting vertical alignment. If the finder patch is not aligned vertically (top to bottom) when your lens is at infinite focus, use the vertical alignment screw 3 to make corrections. This screw moves the finder patch lens bracket up and down. Minor adjustments to the vertical alignment will not affect the horizontal alignment or patch focus. Clockwise = moves patch down.
• Correcting an out-of-focus finder patch. If your finder patch is not sharply focused, i.e. a double image of the finder patch is easily seen in the viewfinder (not to be confused with the superimposed finder patch images seen when a lens is not focused), correct this using the focusing screw 1. This screw moves the finder patch lens bracket in and out, focusing the finder lens. There is a problem that you need to be aware of when adjusting this screw: it also moves the finder patch horizontally slightly, which may affect infinity focus. So, get the patch in focus, then check the focus at infinity as described below, and make corrections if needed (screw 2). Clockwise = moves focus to front (usually: see Note 2 above).
Infinity focus
The procedure for adjusting the rangefinder for correct infinity focus is as follows:
• Correcting horizontal alignment. If your finder patch is not aligned horizontally (i.e. side to side) at infinity, use the horizontal adjusting screw 2. This screw swings the finder patch lens bracket left or right, and hence the finder patch from side to side. Clockwise = moves patch to left (usually: see Note 2 above).
Close focus
After you get the finder in perfect alignment at infinite focus, check the focus at 1 m. After correction for infinity focus, the focus at near distances is usually accurate or off by only a small amount. It is extremely important that you use a lens that you know focuses accurately at close distances.
The procedure is as follows:
- Hang a sheet of newspaper vertically, with the text running from top to bottom, and angle the sheet about 30 degrees to the lens axis, so that the lines of text are at different distances from the camera. Highlight one line of text using a black pen, not only to mark a target line but to give a vertical line so that focusing is easier.
- Mount the camera on a tripod so that the sensor plane (marked on the camera top plate with a crossed-circle symbol) is 1 m from the highlighted line of text.
- Focus on the highlighted line, with the lens aperture fully open to minimise depth of field. Take several test shots, unfocusing the lens between photographs.
- Examine the photos, which should show identical focusing. If they don’t, repeat the test shots.
- If the photos are identical, check that the camera is focused on the target line, and isn’t front- or back-focusing.
Note: the finder patch has parallax error (it’s not in the centre of the frame lines) at 1 m – take this into consideration when testing the focus.
If your lens is not focusing correctly at 1 m but your finder is correctly adjusted at infinite focus, the correct procedure is to adjust the base length via screw 4, which can only be accessed by removing the top plate. However, if the close focus is not out by much, it can usually be corrected with screw 1, avoiding removal of the top plate: although the primary purpose of screw 1 is to focus the finder patch, the degree to which it needs to be turned to correct the usual close focus error of a few centimetres has a negligible effect on the sharpness of the finder patch. As described earlier, you may need to re-adjust infinity focus (screw 2), then recheck close focus.
- Front focus: turn screw 1 anticlockise.
- Back focus: turn screw 1 clockwise.
(These are the usual screw adjustment directions, but they may be reversed: see Note 2 above.)
If the close-focus error is too large to be corrected by adjusting screw 1 (e.g. either the finder patch is too out of focus or infinity focus can’t be achieved when screw 1 is adjusted for accurate close focus), then you will need to remove the top plate so that screw 4 can be turned. If this is the case, readjust screws 1 and 2 for finder patch focus and infinity focus, respectively, before adjusting screw 4.
Adjusting the base length also affects infinity focus: you may have to go back and forth a few times between screws 2 and 4, until you get both infinite and close focus working together, although small adjustments of screw 4 reportedly do not affect infinity focus.
Reassembly
The adjustment screws should be locked with nail varnish or thread-locking compound, taking care not to get any on the rangefinder optics. Thread-locking compound comes in different strengths: it is essential that you use low-strength compound (e.g. Loctite Green) – you’ll never be able to move the screws again if you use a stronger compound! Note that the vertical adjustment screw can’t be re-sealed easily with the top plate on owing to restricted access.
- Why I chose it
- Depth of field
- Light meter pattern
- Rangefinder accuracy
- Frameline accuracy
- Accessory finders
- Infrared sensitivity
- Batteries and chargers
- SD cards
- LCD protection
- Eyepieces
- Problematic lenses
- Flash units
- Using a Visoflex
- Servicing / repair:
-
 Rangefinder adjustment
 - Modifications:
- Downloads / links
- Epitaph