CameraQuest Home Camera Articles FOR SALE Orders I Buy / Wants Repairs Books Adapters
Epson R-D1 modifications: adding 90 mm frame markers
The problem
The R-D1 has framelines for 50 mm lenses, but using longer lenses requires estimation or the use of an external finder for accurate framing.
The solution
This modification adds 90 mm frame markers to the 50 mm framelines, comprising two small round ‘bright spots’ (in analogy to bright lines) marking two diagonally opposite corners of the 90 mm field of view. The bright spots are only visible when the 50 mm framelines are selected, and match the framelines in brightness.
The bright spots are created by drilling two tiny holes in the bright line mechanism, passing through two thin, black-painted brass plates and a plastic frameline mask (Figure 1).
If you later decide that you don’t want the bright spots, simply fill the two entrance holes in the first brass plate and the exit holes in the frameline mask with matt black paint.
Warning: this is a delicate operation – the holes must be carefully made using a precision drill held exactly perpendicular.
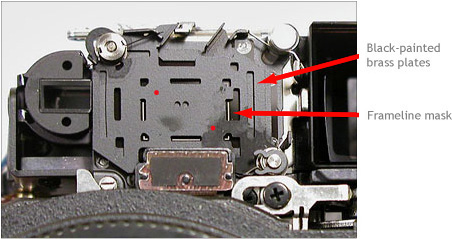
Figure 1. Epson R-D1 frameline mask assembly, set to 50 mm. The two red dots mark the approximate position of the drill holes. (Photo: courtesy of Jim Williams.)
You will need the following:
- tools and double-sided tape as described in Disabling the AE lock
- Three 0.30 mm micro drill bits (one of these is a spare, as they snap easily) – this size will make holes the same width as the bright lines
- vernier calipers or an accurate ruler
- a sharp pencil
- matt black paint
- a hands-free magnifying glass (optional but handy).
Procedure
1. Ensure that the framelines are set to 50 mm, and remove the top plate, to allow access to the bright line mechanism. Note the two brass plates that have lines machined in them, behind which can be seen the frameline mask.
2. Lightly draw pencil lines on the top plate to connect the frameline corners diagonally. Measure 2 mm from the top right frameline corner along one diagonal line, and mark this point in pencil. Repeat for the bottom left frameline corner. (If you prefer, use the two opposite corners.)
3. Place the camera in a stable position, angled downwards so that swarf will not fall into the camera.
4. Carefully drill two holes through the two plates and the brightline mask, ensuring that the drill bit is perpendicular to the plates. Try and drill through all three parts in one procedure, without stopping, as this makes the task easier, and you’re less likely to break the drill bit. Also, the bits blunt easily, so use a fresh bit for each hole.
5. Brush off the swarf.
6. Clean off the burrs from each drill exit hole in the frameline mask, as these cause unwanted reflections (take care not to scratch the mask). The bright brass from inside the holes also catch the light. To cut down these reflections, paint the interior of the holes with matt black paint, running a nylon bristle through them immediately afterwards to keep them clear. (Note: take great care not to get paint on the framelines on the mask.)
7. Reassemble the camera.
- Why I chose it
- Depth of field
- Light meter pattern
- Rangefinder accuracy
- Frameline accuracy
- Accessory finders
- Infrared sensitivity
- Batteries and chargers
- SD cards
- LCD protection
- Eyepieces
- Problematic lenses
- Flash units
- Using a Visoflex
- Servicing / repair:
- Modifications:
-
 Adding 90 mm frame
markers - Downloads / links
- Epitaph