CameraQuest Home Camera Articles FOR SALE Orders I Buy / Wants Repairs Books Adapters
Epson R-D1: Accessory finders
Introduction
The viewfinder of the Epson R-D1 offers parallax-compensated framelines for 28, 35 and 50 mm lenses, equivalent to roughly 40, 50 and 75 mm owing to the R-D1’s APS-size digital sensor. If you want to use lenses other than these on your R-D1 – such as some of the many fascinating lenses made in the past 70-odd years, then you’ll need an accessory viewfinder to show you what the lens will see.
Stephen Gandy of CameraQuest has an excellent overview of accessory finders.
Single-focal-length finders
Until 2007, Cosina Voigtländer produced wide-angle finders designed specifically for the R-D1 that take account of the 1.53 crop factor, for their 12, 15, 21 and 25 mm lenses.
Owing to the 1.53 R-D1 crop factor, many accessory finders designed for 35 mm film camerasare unsuitable, as their field of view will not match most standard focal lengths. Two exceptions are 35 and 135 mm finders: the former is suitable for 21 mm lenses (= 32 mm on the R-D1), and the latter for 90 mm lenses (= 32 mm on the R-D1).
Zoom finders
A zoom finder is probably the most convenient and cost-effective solution. There is a reasonably wide choice, although most are now quite old, dating from the 1950s and 1960s, and their quality is variable. The best zoom finders are the Nikon (Nippon Kogaru) Varifocal finder (either of the two types) or the Tewe Polyfocus zoom finders, which have excellent optics with little distortion and suit the R-D1 well (Figures 1 and 2). The Nikon finders zoom from 35 to 135 mm, whereas some Tewe finders have a wider zoom range (typically 35–200 mm); an accessory push-on wide-angle lens is available for each, extending the view to 28 mm, but these are now very rare, as most have been lost over the years – and collectors have pushed their price to well beyond the finders themselves! Both finders have a parallax correction mechanism.
 |
 |
| Figure 1. Nikon varifocal zoom finder, second version. |
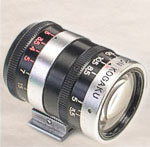
Figure 2. Tewe Polyfocus zoom
finder. |
The Nikon finder has a slightly better build quality than the Tewe finder, with a little less distortion and a larger viewfinder window. I prefer the Tewe finder, owing to its greater zoom range.
Both of these zoom finders have two index marks against which the focal length marks can be aligned – as the instructions are long gone, I was initially unclear why there where two index marks. I have since found out that these marks correct for the slight decrease in the field of view that occurs when the lens focus is moved from far to near: use the main index mark (Nikon = black dot, Tewe = line with black dot) for normal, distant subjects and the other index mark (Nikon = red dot, Tewe = line without black dot) for subjects closer than 20 focal lengths of the lens in use.
The Tewe Polyfocus 35–200 mm zoom finder
By Jim Williams
Tewe, a German optical company, specialised in viewfinders: their Mark 3B was the first purpose-made ‘director’s viewfinder’ for use by film directors and cinematographers. (Director’s viewfinders are still an important cinema tool; for an interesting short history, visit www.directorsviewfinders.com.)
The Tewe Polyfocus finder for 35 mm cameras is a simplified version of the company’s director’s viewfinder (Figure 3). A calibrated ring zooms the focal length from 35 to 200 mm; the view is bright and clear, although the edges of the field (defined by a mask at the front) are fuzzy rather than sharply defined, as on, say, a Zeiss turret finder. A manually operated lever at its base tilts the finder in an effort to compensate for parallax.
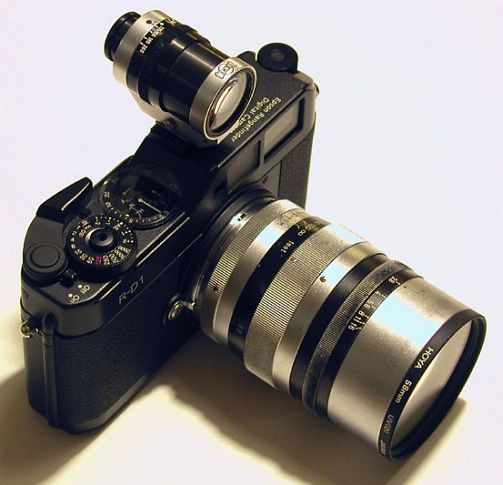
Figure 3. An R-D1 with a Canon 85 mm f/1.5 lens, and equipped with a Tewe Polyfocus viewfinder, bought on eBay for $35.
How accurately does the Tewe finder frame the image for my various lenses? I decided to take some test pictures to find out.
So, I mounted the R-D1 on a tripod and aimed it at a set of bookshelves, taking photographs using lenses of different focal lengths. (Sorry I didn’t do a better job of leveling the camera.)
First, I looked through both the camera viewfinder and the Tewe finder, making notes about the area each one covered. Then I took a test picture. Later, with the image open on my computer, I referred back to my notes to find the edges of the finder views. I made approximate marks in an image editor: the green rectangle shows the approximate view of the camera’s built-in finder, while the red rectangle shows the view through the Tewe finder.
35 mm lens
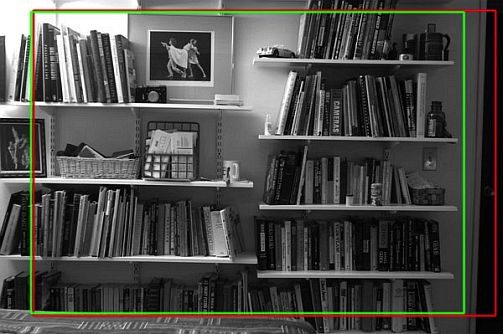
In this case I used a 35 mm f/1.7 Voigtlander Ultron lens. To allow for the R-D1’s 1.53 crop factor, I set the Tewe finder’s scale to 50 mm.
Both the built-in and Tewe finders showed about the same area, with the Tewe finder including a little extra on the right. Both finder views are safely within the actual picture area. Viewfinders are designed to be a bit ‘tight’ as a safety measure – this way, as long as you can see something in the finder, you can be sure that it will be in the final image.
50 mm lens
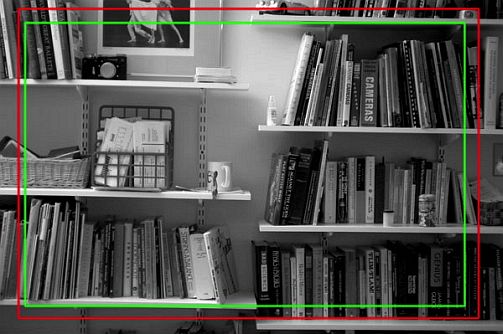
Here, a 50 mm f/1.4 Canon lens was used. To allow for the R-D 1’s crop factor, the Tewe finder’s focal length scale was set to 75 mm.
In this case, the Tewe finder shows a bit more than the camera’s viewfinder. In fact, it’s getting a little too close to the top of the frame for comfort. Tewe had to design the finder’s parallax compensation mechanism to work with a wide range of cameras; the dimensions of the R-D1 may be a bit ‘off’ compared to what they intended.
85 mm lens
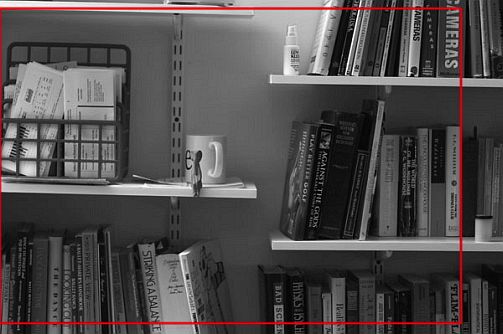
Here, I used an 85 mm f/1.5 Canon lens. Since the camera has no built-in finder frame for this focal length, there’s no green rectangle in this image. To allow for the R-D1’s crop factor, the Tewe’s focal length was set to 135 mm.
We’re definitely too tight on the left here, and there isn’t much breathing space vertically either! This suggests that when using the 85 mm lens on the R-D 1, I’d probably better set the finder to 150 mm instead of 135 mm – which is more closely equivalent to the Epson’s built-in frame lines, which show approximately 85% of the picture area:
actual focal length × crop factor / 0.85 = equivalent focal length,
so
85 mm × 1.53/0.85 = 153 mm.
100 mm lens
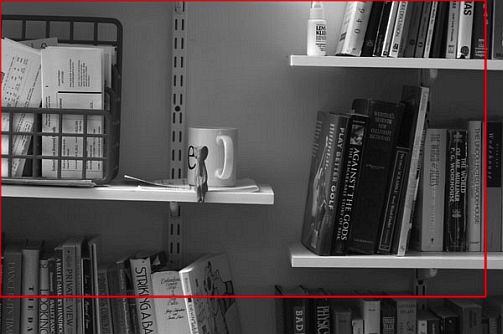
A 100 mm f/2 Canon lens was used here, with the Tewe finder at 150 mm.
This is definitely too close for comfort at the left and top! Again, this tells me that when using this lens on the R-D1, I’d better set the finder to a longer focal length, to give myself a little more margin for framing error:
100 mm × 1.53/0.85 = 180 mm equivalent focal length.
135 mm lens
This lens – a 135 mm f/2.8 Komura – was tested later, in actual use, so a comparison image of finder views isn’t available.
This lens was used on my R-D1 for photographing dancers onstage, with mixed results. The problem wasn’t so much focusing accuracy, which can be handled fairly well if you’re careful, but, rather, that it was really difficult to make sure that the Tewe finder (the only thing I have that can handle the 135 mm lens’s 206 mm effective focal length) was pointing in exactly the same direction as the lens: there has to be a bit of play in the accessory shoe to allow accessories to slip in and out, but this also allows the finder to point slightly offline compared with the lens.
In practice, when using long lenses, rather than trying to frame each shot precisely through the auxiliary finder, I just look through it when picking a shooting location, to see what type of crop I’m getting at that distance: a head-and-shoulders shot, or a waist-up shot, a full-body shot, or whatever. (Obviously I’m mostly a people shooter: you’ll have to adapt this technique to your own preferred subject matter.) I also note where various landmarks in the scene fall in relation to the view through the finder. Once I’ve familiarised myself in this way with the field of view, I don’t really need to look through the auxiliary finder that often: I can concentrate on follow-focusing through the camera’s viewfinder, just looking through the accessory finder occasionally, to refresh my memory as to the field of view.
(I am grateful to Jim Williams for kindly given me permission to publish the above article on using the Tewe finder with an R-D1.)
- Why I chose it
- Depth of field
- Light meter pattern
- Rangefinder accuracy
- Frameline accuracy
-
 Accessory finders
 - Infrared sensitivity
- Batteries and chargers
- SD cards
- LCD protection
- Eyepieces
- Problematic lenses
- Flash units
- Using a Visoflex
- Servicing / repair:
- Modifications:
- Downloads / links
- Epitaph